
How to Update 3DEXPERIENCE SOLIDWORKS (SOLIDWORKS Connected)
SOLIDWORKS Connected ensures you have access to the most recent features and improved performance through regular updates. This guide will assist you in downloading and installing updates for SOLIDWORKS Connected.
When an update is released, a dialog window appears when you start SOLIDWORKS Connected. This notifies you that an update is available and provides an option to either “Get Update” or “Skip”. It also displays a countdown of how long you’ll be able to continue using your current version. This allows you to allocate time for the download and installation process before support for the previous version ceases.
When you are ready to update, launch SOLIDWORKS Connected and watch for the pop-up to show.

3DEXPERIENCE Update Popup
NOTE: Alternatively, you can jump straight to the 3DEXPERIENCE platform and proceed with the following steps.
When you click on “Get Update,” the system will redirect you to the 3DEXPERIENCE webpage and prompt you to log in. From there, click the 3DCompass in the top left of your screen. Find SOLIDWORKS Connected in your apps list on the left, and select the dropdown arrow on the right side of the icon to begin.

3DEXPERIENCE 3DDashboard
Next, a flyout menu appears showing you that a new update for the SOLIDWORKS software is available. Click on the update arrows to continue the update.

My Favorite Apps
Depending on the update, this may start by updating your 3DEXPERIENCE launcher. If prompted, click “Update all Roles” to be sure you have access to the latest version of all of your 3DEXPERIENCE applications.

3DEXPERIENCE Installation Menu
A new screen will pop up, showing which update is being installed. Click “Next”, and the installer will gather the necessary information. Once prompted, begin the installation (you may have to click on SOLIDWORKS Connected again to start the process).
Prior to the installation, you will receive one more prompt. Ensure that you have sufficient storage space available before proceeding with the installation. When ready, click “Install”.
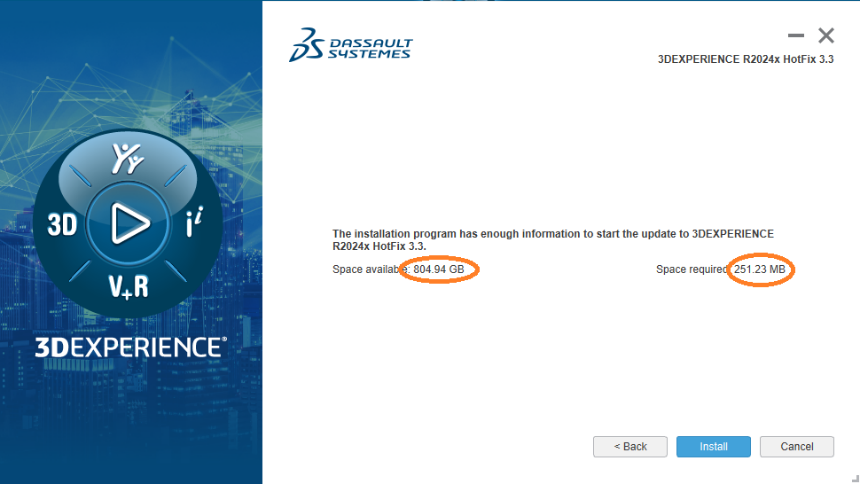
Ensure your machine has enough space available for the install.
Depending on the update being installed, you may see a screen asking which add-ins you want with SOLIDWORKS Connected. Check those you’d like to include in this update, or simply click “Next” to continue with default settings.

Select SOLIDWORKS Add-ins
NOTE: If a desired Add-in is not installed during this step, you have to uninstall and then reinstall SOLIDWORKS Connected to be presented with the option to install them again.
The installation may take time. This depends on the update size, the number of add-ins, your internet speed, and your computer's performance.
Once you complete the installation, you will receive a confirmation of what you installed. Click “Close” and your updated SOLIDWORKS Connected is ready to use as normal!
Follow our blog to learn more about SOLIDWORKS and 3D CAD.

Complete 3DEXPERIENCE Install
Tom has spent fourteen years as a design engineer in the transportation, office furniture, and DOD fields, the last ten of which have been dedicated to learning the ins and outs of using SOLIDWORKS in a professional capacity. His first experience with SOLIDWORKS came through an opportunity to use it in R&D, and he has since leveraged its capabilities to lead projects from initial design to pilot runs to finished product. He loves mountain biking, camping, music, and evening walks with his wife, son, and golden retriever, Olly!
Connect with Tom on LinkedIn