
How to Manage SOLIDWORKS Revisions with 3DEXPERIENCE
Let’s say that you’ve spent some time creating and finalizing a design that you’ve been working on, only to later realize that your finished model requires some modification. You’ve set out to begin these modifications, but you’d like to update your design without overwriting the original product. Revising your model is now your task at hand; in other words, your current objective is to create a new revision of your existing file so that you can update your model while maintaining your design history. Luckily, using SOLIDWORKS with 3DEXPERIENCE facilitates the process of handling revisions, and makes it possible to work with revisions seamlessly and efficiently. In this blog, we’ll take a look at handling revisions in SOLIDWORKS with 3DEXPERIENCE.
When you get to the stage in the design process where revisions are necessary, you’ve probably already gone through the motions of Saving to 3DEXPERIENCE from SOLIDWORKS. When your file is successfully saved to the platform, you will see quite a bit of valuable information in MySession, which you can access from the 3DEXPERIENCE tab of your SOLIDWORKS Task Pane:

(Recall: the database icon with the green checkmark in the Status column indicates that the most recent version of your file is saved to the platform!)
The column that we mainly want to focus on as we get started with the revision process is the ‘Rev’ column. This is the Revision column; the revision of the part or component(s) that you are currently working with will be listed here. This means that, if you have several revisions of any single component, the item listed in this column indicates the revision that is currently being used in this file. Notice that the current revision in the screenshot above is listed as A.1*; when you save your file to the platform for the first time, this information is populated automatically.
Note: If desired, you can change the format of your revisions!
You can choose to have either a ‘Major’ revision or a ‘Major and Minor’ revision. Furthermore, there are two main types of revision schemes – alphabetical or numerical.
Major revision schemes will consist of a single character, either a number or a letter (A, B, C,… or 1, 2, 3,…), while Major and Minor revision schemes consist of two characters separated by a decimal point (A.1, A.2, B.1,… or 1.1, 1.2, 2.1,…).
If the maturity state of your revision is set to ‘Released’, the Major revision scheme’s value will increase to the next subsequent value. Otherwise, it will be the Minor revision scheme whose value will increase.
For more information on revision schemes and the importance of revisions, refer to our blog on the topic!
So, how do we start a new revision when working in SOLIDWORKS connected to 3DEXPERIENCE?
There are a couple of ways to do this – we can go through either the CommandManager, or the Task Pane.
Creating a New Revision from the CommandManager (‘Save with Options’)
First, access the ‘Save to 3DEXPERIENCE’ dialog box from the Lifecycle and Collaboration tab of your CommandManager, using the ‘Save with Options’ command:

Once you’re in the ‘Save to 3DEXPERIENCE’ dialog, you’ll notice a column for Revision, which lists your part’s current revision, and another for New Revision.
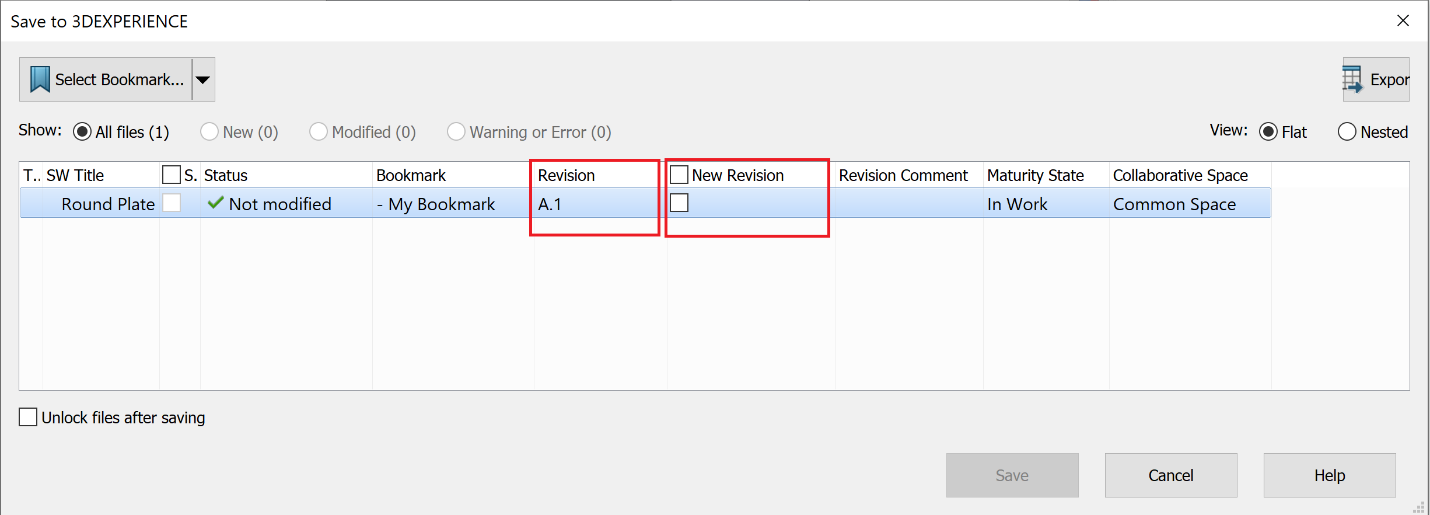
Also notice that the Bookmark you selected when initially saving your file to the platform, if any, is listed in the Bookmarks column.
Selecting the checkbox in the New Revision column allows you to create a new revision:

Before proceeding, pay attention to your Bookmarks column; the Bookmark that was listed just a moment ago is now no longer selected. As soon as you check the New Revision checkbox, the previously-applied Bookmark is cleared. Because you’ve opted to create a new revision, you will have to select a Bookmark for the new revision specifically.
PRO TIP: Be sure to select a Bookmark while you’re here – this will make it easy to access your revisions later! Take advantage of adding your revisions to the same Bookmark for ease of access!
Bookmarks facilitate the process of finding your files in 3DEXPERIENCE, so it is highly recommended to use Bookmarks when saving to the platform.
For a refresher on how to use Bookmarks when saving to the 3DEXPERIENCE platform, please see our article on Saving to 3DEXPERIENCE from SOLIDWORKS.
Once the New Revision checkbox is selected and your Bookmark is specified, we can go ahead and click the ‘Save’ button in the dialog. This will successfully start your new revision.

Creating a New Revision from the 3DEXPERIENCE Task Pane (MySession)
Alternatively, you can create revisions from the Task Pane by right-clicking on the part file in MySession and selecting the ‘New Revision’ option from the menu:

This will bring up a ‘New Revision’ popup that lists the name of the new revision and includes a text box in which you can optionally add a revision comment. Other than an optional comment, all you need to do here is hit ‘Revise’!

Keep in mind, though – creating a new revision using this method will not add your revision to a Bookmark. If you’d like to access your revisions in SOLIDWORKS Connected down the line, you will need to take the extra step to add your newly-created revision to a Bookmark, which you can do by accessing the ‘Save with Options’ command in your Lifecycle and Collaboration CommandManager tab and then selecting the Bookmark from the ‘Select Bookmark’ button in the top-left corner. You can access the first method by selecting ‘Save with Options’ from this right-click menu as well.
Note: Make sure that the ‘New Revision’ checkbox is unchecked here; if it’s checked, you’ll end up creating another revision!

For more details on selecting a Bookmark within the ‘Save to 3DEXPERIENCE’ dialog, please see our article on Saving to 3DEXPERIENCE from SOLIDWORKS.
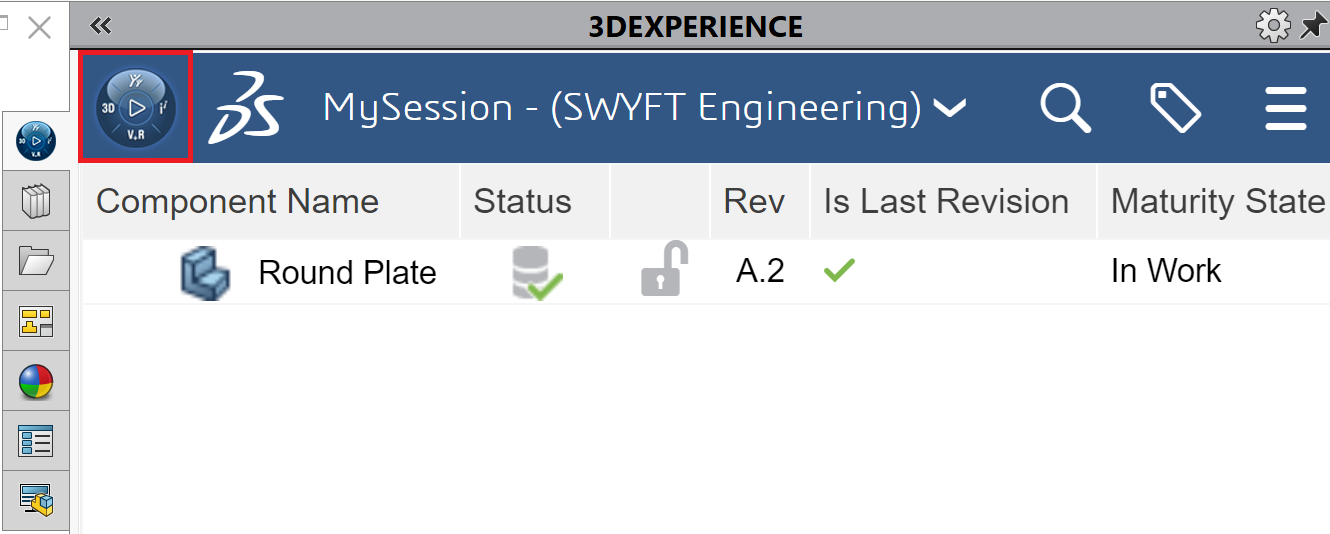
Regardless of the path you took to create it, your revision will be created successfully at this point. Now, back inside of MySession in your Task Pane, you will see that the revision value has been updated to the next subsequent value to indicate the new revision. As you can see, starting with Revision A.1 led us to Revision A.2.

Another thing to note – the column here that reads ‘Is Last Revision’ lets you know whether or not the active revision is in fact the latest one that has ever been created for this component. This is a good indicator that provides insight on whether or not the file you are working on references the most up-to-date revision. The green checkmark is your confirmation that the current revision is in fact the latest.
Now that you’ve created your new revision, you can start making your design modifications!
Note: Please refer to our blog on Saving to 3DEXPERIENCE from SOLIDWORKS for more information on how to navigate modifying and saving files that already exist on the platform.
And, that’s it! We’ve effectively walked through the general workflow for creating new revisions.
Following this workflow allows you to update your models without overwriting their original designs and product history, thus giving you the ability to refer back to outdated designs at any stage of the product development process if necessary.
Accessing Revisions from 3DEXPERIENCE in SOLIDWORKS
Now, this leaves us with the question: How and where do we access these revisions in SOLIDWORKS Connected once all is said and done?
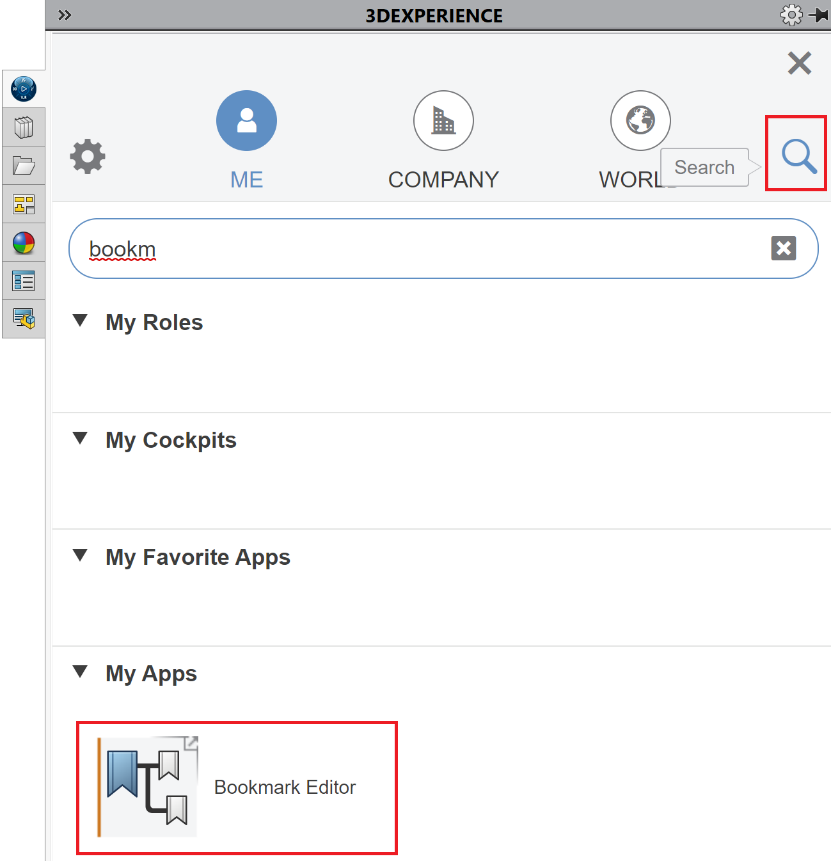
Navigate to your created Bookmarks from the Bookmark Editor app, which you can access from within MySession by clicking the 3DCompass and selecting the app. From here, you can access any of your Bookmarks, and your revisions should be located in the Bookmark you specified earlier!
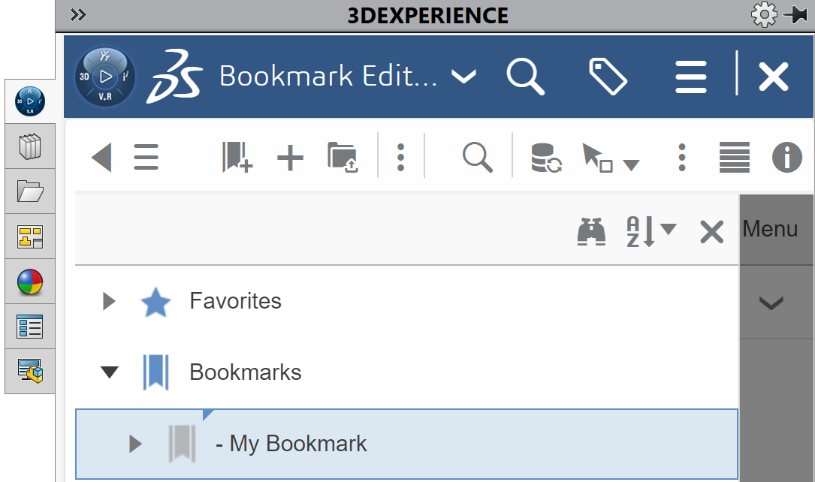
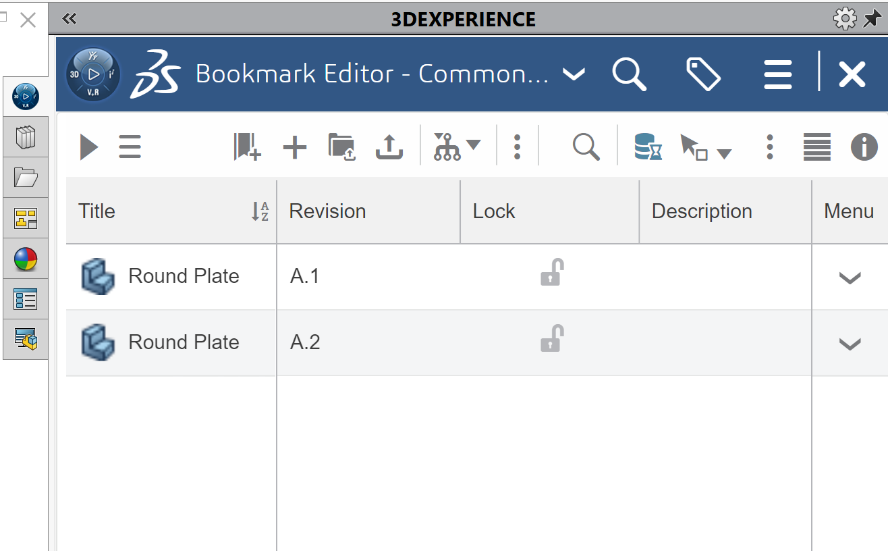
From here, you will be able to open any of your revisions from its right-click menu:

And just like that, you can seamlessly create new revisions of your model while still being able to access the outdated ones!
Keep in mind: Whenever the revision being used in your open file is outdated, you will see a red X icon in the ‘Is Last Revision’ column inside of MySession, rather than the green checkmark we saw earlier. This information lets you know that there exists on the platform a more recent revision that is currently not being used in your file.

To avoid any rework or discrepancies between the existent files when you see that a revision in your file is outdated, you can take advantage of the ‘Replace by Revision’ options that you can find by right-clicking the outdated component in MySession:

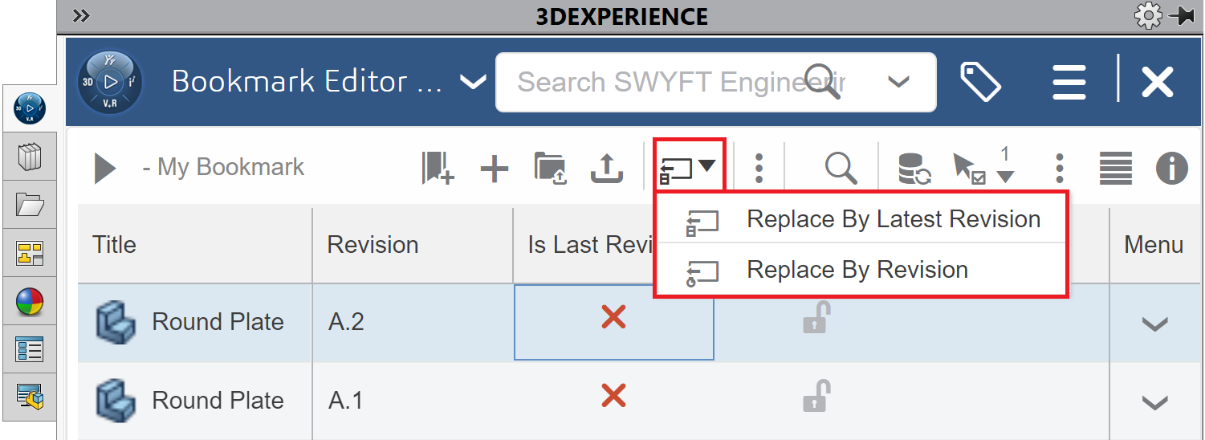
If you expand the ‘Replace by Revision’ options by selecting the right-pointing arrow (>), you will see 3 available options. Choosing to ‘Replace by Latest Revision’ will replace the component in your file with the most recent revision that exists on the platform.

If you would like to load a specific revision into your current session, you can select ‘Replace by Revision’ and you will be prompted with a dialog window that will allow you to select the desired revision and load it into SOLIDWORKS.

PRO TIP: If you’ve created a new revision without specifying a Bookmark, it is possible to update the revision that’s already loaded in the Bookmark to the latest!
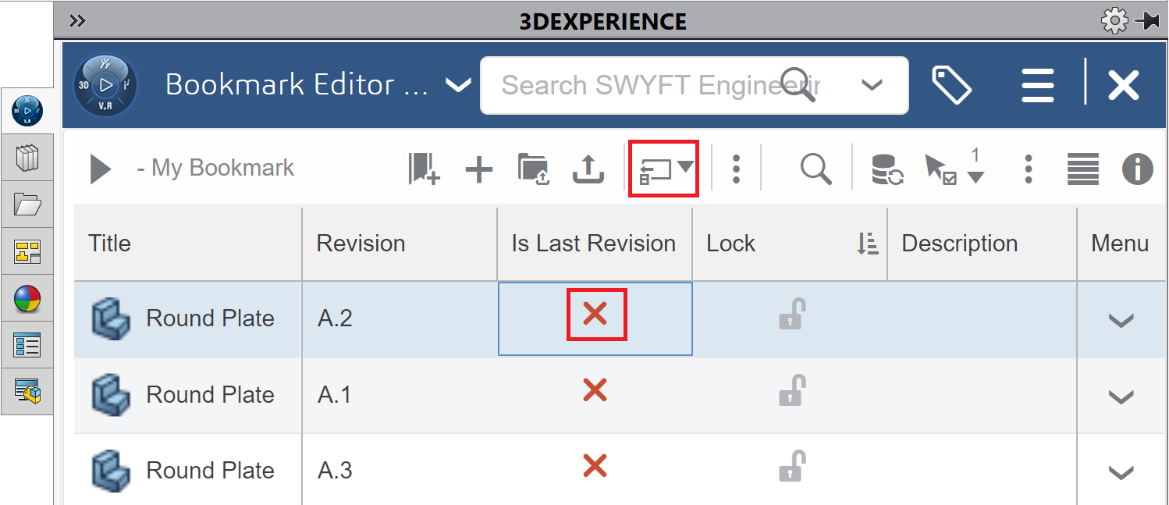
To do so, access the Bookmark Editor in the Task Pane, and then select the file whose revision is out-of-date. From here, you can click on either the icon under the ‘Is Last Revision’ column, or the icon pictured in the overhead toolbar. Whichever, way you go, you’ll have the option to replace by revision!
If you use the ‘Replace by Revision’ option from the icon in the overhead toolbar, you will get the same ‘Replace by Revision’ box that you’ll jump straight into by using the ‘Is Last Revision’ status icon (second image below). In this box, you will select the desired revision that you wish to use as the replacement.
The ‘Replace by Latest Revision’ option will simply replace the selected revision with the latest one.
A few final things to note:
When you look up your file in the Task Pane using the 3DSearch bar, which you can access by clicking on the magnifying glass icon inside of MySession, your revision results will depend on your search settings.
Depending on your search settings, you might see the latest revision of your file only, or you might see all of the revisions that exist for the file you looked up.
Keep in mind that if you have multiple revisions for a particular file but your search results only lists your file once, opening this file from the right-click menu will open the latest revision specifically.
Because of this, it is highly recommended that you take advantage of Bookmarks when working with revisions as Bookmarks facilitate the task of finding and accessing your files in SOLIDWORKS.
Revision vs. Version
This brings us to our last item to note: You may have picked up on the general use of the terms version and revision; these two terms appear to be very similar, but they actually mean very different things. For this reason, it is important to understand the implications of each and the differences between the two.
The term Revision refers specifically to actual revisions that have been created in the manner outlined in this article. Revisions are files that have been updated without overwriting the previous designs to preserve product history.
The term Version, on the other hand, simply refers to the modification of your current file. For example, when you save a part to the platform and then modify it afterward, you will see the icon in your MySession Status column update to depict either of these icons superimposed with the orange floppy disk:


In their own ways, both of these icons let you know that the most recent version of your file has not yet been saved to the platform. This means that the file that currently exists on the platform does not yet reflect the changes you’ve made, making the version of your file on the platform out-of-date. This applies in all cases when you are working in SOLIDWORKS connected to 3DEXPERIENCE and saving to the platform – even when you are not creating actual revisions.
Summary
We’ve made it to the end! In this blog article, we explored the process of creating revisions inside of SOLIDWORKS Connected, and we looked at how we can access these revisions in SOLIDWORKS once they’re on the 3DEXPERIENCE platform. Along the way, we highlighted some best practices and tips to keep in mind while moving through the workflow. Stay tuned for additional guides coming your way!
Sarah is a Technical Support Engineer at SWYFT Solutions with a background in computer-aided design and technical instruction. She graduated from California State University, Fullerton with a Bachelor’s degree in Mechanical Engineering. During her free time, Sarah enjoys road trips, playing piano & writing music, and bringing her personal ideas and creations to life by designing in SOLIDWORKS and 3D printing.
Connect with Sarah on LinkedIn