
How to Save SOLIDWORKS Data to 3DEXPERIENCE
You’ve gotten started with 3DEXPERIENCE SOLIDWORKS or SOLIDWORKS Cloud Services, and you’re finally up and running; now, it’s time to get to work! With your 3DEXPERIENCE SOLIDWORKS or Collaborative Designer for SOLIDWORKS role, you have the ability to work inside of SOLIDWORKS in a cloud-connected setting and save your content directly to the platform. In this blog, we’ll briefly go over the saving options available in SOLIDWORKS when connected to 3DEXPERIENCE, and we’ll take a look at saving your files to the 3DEXPERIENCE platform from directly within SOLIDWORKS.
SOLIDWORKS can connect to the 3DEXPERIENCE platform either through the SOLIDWORKS Connected app (3DEXPERIENCE SOLIDWORKS) or through the 3DEXPERIENCE add-in installed alongside a desktop license. If you’ve used SOLIDWORKS Desktop before, the cloud-connected environment will be quite familiar to you – down to the general user interface and the processes of creating your part, assembly, and drawing files. But of course, there are differences between the two. A major difference between SOLIDWORKS connected to 3DEXPERIENCE and SOLIDWORKS Desktop becomes evident once you are ready to save your file – how and where should you save it?
When working in SOLIDWORKS Connected, or in SOLIDWORKS Desktop with the 3DEXPERIENCE add-in installed, you’ll notice that there are a few different saving options when you go to save your file from the File drop-down menu:
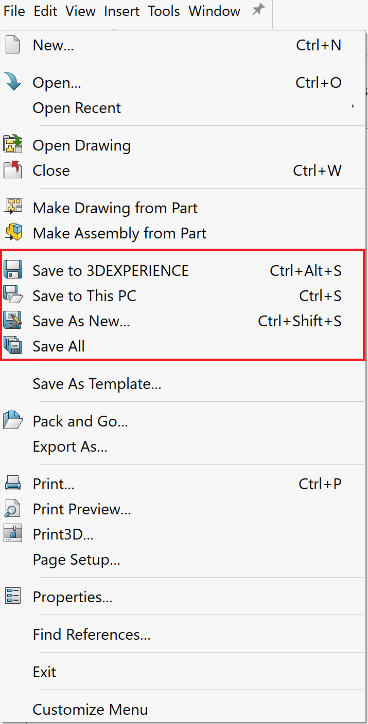
In this article, we’ll mainly focus on the first 2 options in this list.
How to Save Data Locally to Your Computer
SOLIDWORKS Save Option: ‘Save to this PC’
Let’s start with the option ‘Save to this PC’. Yes, this is exactly what it sounds like: this option allows you to save your file locally on your personal machine. When saving your file for the first time, this option will bring up the ‘Save As’ dialog. Any subsequent saves using this option will behave in the same way as any other ‘Save’ button would – it saves your work in the same current file.
It’s important to note that this option does the exact same thing that the regular ‘Save’ function in SOLIDWORKS Desktop does; and keep in mind, this is the only way you can save your files in the Desktop version.
Also note that the keyboard shortcut for the ‘Save to this PC’ option is CTRL+S, which is the same keyboard shortcut for any regular save. This means that any time you hit CTRL+S on your keyboard when working in SOLIDWORKS Connected, your file is being saved locally on your personal computer.
How to Save New Data to 3DEXPERIENCE
SOLIDWORKS Save Option: ‘Save to 3DEXPERIENCE’
Now, let’s talk about the ‘Save to 3DEXPERIENCE’ option. This is where the magic happens! This option allows you to save your file directly to the 3DEXPERIENCE platform simply from within SOLIDWORKS.
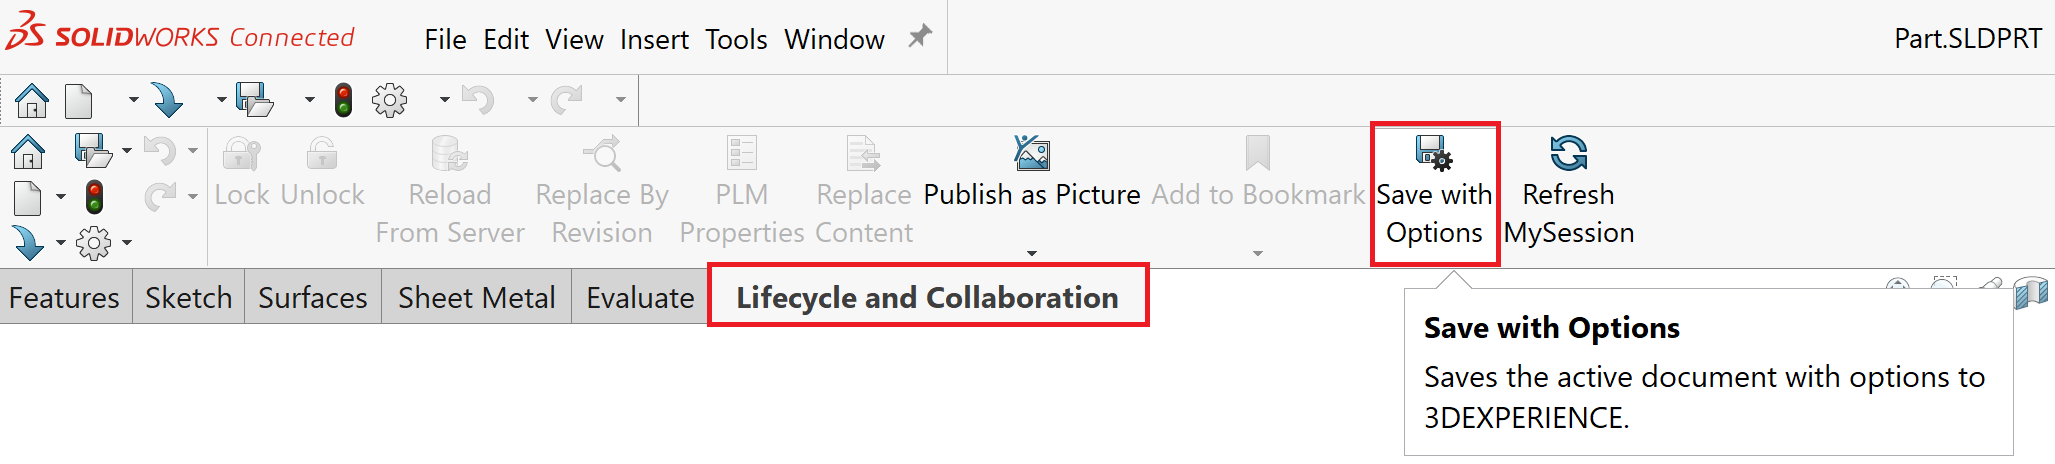
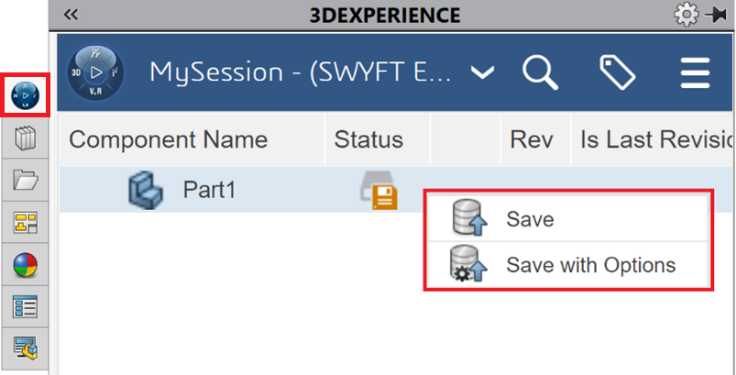
There are 3 ways to access this save option:
From the File drop-down menu, as shown earlier.
From the Lifecycle & Collaboration tab of your CommandManager, using the ‘Save with Options’ command.
By right-clicking your file from inside of the 3DEXPERIENCE tab of your SOLIDWORKS Task Pane, known as MySession, and selecting the desired save option from the menu.
When saving your file for the first time, all of these paths ultimately lead you to the same place – the ‘Save to 3DEXPERIENCE’ dialog.

Before we keep going, a few things to keep in mind:
The ‘Save to 3DEXPERIENCE’ option in the File dropdown menu will only bring up the ‘Save to 3DEXPERIENCE’ dialog upon saving your file to the platform for the first time. Any subsequent saves using this option will save your work in the same file on the platform, without bringing up the dialog.
Similarly, the ‘Save’ option that you can access by right-clicking your file inside of MySession as shown above will only bring up this dialog if this is the first time you are saving your file as well.
If you would like to save within the ‘Save to 3DEXPERIENCE’ dialog for any subsequent save, be sure to access the ‘Save with Options’ command from either the CommandManager (Method 2 above), or by right-clicking your file in MySession and selecting it (Method 3).
Pro Tip: There’s actually a 4th way to save to the 3DEXPERIENCE platform! Selecting the ‘Save As New’ option from the File dropdown menu brings you to the ‘Save As’ dialog, where you will see two save buttons – ‘Save’ and ‘Save to 3DEXPERIENCE’.
Hitting the ‘Save’ button in this dialog will save a new copy of your file locally, while selecting ‘Save to 3DEXPERIENCE’ brings up another dialog box for ‘Save As New’. Hitting ‘Save’ in this secondary dialog brings up the ‘Save to 3DEXPERIENCE’ dialog shown above.


The ‘Save to 3DEXPERIENCE’ Dialog Box
So, what should we do when we’re here in the ‘Save to 3DEXPERIENCE’ dialog?
The main thing you’ll want to do is ensure that you save your file in a way such that you can easily find it once it’s on the platform. A great way to do this is by saving it directly into a Bookmark. You can loosely think of a Bookmark as a “folder” in which you'll save your file, but keep in mind that Bookmarks are quite different than folders in that they’re more of a collection of links to your files, rather than a collection of actual stored data. All in all, Bookmarks allow you to quickly navigate items of interest without searching too far.
Note: Locating your files through Bookmarks will be covered as a separate topic.
To save your file into a Bookmark, click on the ‘Select Bookmark’ button located in the top-left corner of the dialog:

This will bring up the ‘Select a Bookmark’ dialog, where you can create a Bookmark if you haven’t already. To create a Bookmark from within this dialog, be sure to first highlight the Bookmarks item by selecting it, and then click on the ribbon icon with the plus sign in the top-left corner:

Note: If you already have a previously-created Bookmark that you’d like to use and you do not need to create a new one, simply select it here from the Bookmarks dropdown menu. Disregard the previous step and skip ahead.
From here, you will give your new Bookmark a name in the Title field, and in the Credentials field, specify the Collaborative Space that you’d like your Bookmark to be created in. New users will see the Common Space as their active Collaborative Space (unless the administrator had made modifications prior).

Once you’ve specified this information and hit OK, you’ll see the Bookmark you just created listed in the Bookmarks drop-down menu. From here, select your Bookmark, and click Apply.

We’re almost there! Now, back in the ‘Save to 3DEXPERIENCE’ dialog, you will see your selected Bookmark listed under the Bookmarks column. A couple of other things to note in this dialog:
1. The drop-down menu in the top-left corner of the dialog, to the right of the ‘Select Bookmark’ button, is where you specify the Collaborative Space that you will save your file in.
Note: This is only available if you have access to multiple Collaborative Spaces. Otherwise, you won’t need to worry about it!
2. The Collaborative Space column lists the Collaborative Space that is currently selected in the aforementioned drop-down menu.

To finalize your save to the 3DEXPERIENCE platform, all you have to do now is hit the ‘Save’ button!

And, done! Your file has been successfully saved to the 3DEXPERIENCE platform. You can confirm this by accessing the 3DEXPERIENCE tab of your SOLIDWORKS Task Pane, which brings up MySession, and paying attention to the icon under the ‘Status’ column. The database icon with the green checkmark indicates that the most recent version of your file is in fact saved to the platform!

But remember – saving your files to the platform is only half the story! Be sure to check out our blog on Opening your Files from 3DEXPERIENCE in SOLIDWORKS to complete the full picture of saving your files to and opening your files from the 3DEXPERIENCE platform in SOLIDWORKS.
Of course, being informed on how to open your files from the platform in SOLIDWORKS will be very handy for when you’d like to re-access a file that you’ve already saved to 3DEXPERIENCE.
How to Save Changes to Existing Data on 3DEXPERIENCE
Needing to modify your design in SOLIDWORKS after saving your progress to the 3DEXPERIENCE platform will most likely be a common occurrence in your work. So far, we’ve looked at saving to the platform for the first time, and we’ve briefly mentioned how certain options might behave differently depending on whether you are saving to the platform for the first time or if it’s a subsequent save. But now, the question is, how do you actually go about saving changes made to files that already exist on the platform?
In short, you can save your changes to the same file on the platform by using any of the ‘Save to 3DEXPERIENCE’ options outlined earlier. However, re-saving a file to the platform involves a couple extra steps, as you will see. Read on!
First things first, you will need to familiarize yourself with the process of Opening your Files from 3DEXPERIENCE in SOLIDWORKS if you haven’t already, as you’ll likely need to re-access your file before making changes to it.
Once you’ve successfully opened your file in SOLIDWORKS, you can get to work!
As you start modifying your model, you might notice a message across the very top of your screen that reads ‘Not locked: Lock this document if you intend to save your changes to 3DEXPERIENCE’:

NOTE: You will see this message only if you’ve started making changes to your file before it is locked.
The ‘Not locked’ status is also reflected by the gray lock icon in the Lock Status column in MySession:

As a best practice, you should always reserve, or lock, the file you are working on before you start your modifications, and keep it reserved while you work on it. This ensures that nobody else on your team will be able to make any changes to the model while your work is in progress.
In fact, you will not be able to actually save your work to the platform until your file is locked. If you were to access the ‘Save with Options’ command to bring up the ‘Save to 3DEXPERIENCE’ dialog, you will see that the ‘Save’ button is grayed out, and your part’s status will be Lock required.

NOTE: Selecting ‘Save to 3DEXPERIENCE’ from the File dropdown menu will also bring you to this dialog in such cases, as you will not be able to perform a subsequent save without locking your file first.
So, let’s go ahead and click on the ‘Lock’ button in the overhead message pictured above. Alternatively, you can lock your file by right-clicking on it in MySession and selecting ‘Lock’:

Upon doing so, the icon under the Lock Status column in MySession updates to reflect that of the ‘Locked by me’ status:

Now that the part file is reserved by you, you can proceed with making your design changes! Once you are done modifying your model, you’ll want to make sure that you do two things:
Save your work to the 3DEXPERIENCE Platform, using any of the options outlined previously.
Unlock the file, so that it is no longer reserved by you.
Recall that you can confirm whether or not the latest version of your part is saved to the platform from the icon depicted in the ‘Status’ column. Whenever you see a status icon superimposed with the orange floppy disk, it means that the current version of your file has not yet been saved to the platform.

For your reference, the following table summarizes the Status icons that you might see in MySession:

As soon as you save your work to the Platform, you’ll notice that the status icon does in fact update to reflect this!

So let’s go ahead and unlock our file, which we can do by right-clicking the part file and selecting ‘Unlock’ from the menu:

Once your file is unlocked, the Lock Status column will reflect this by depicting the gray lock icon.

For your reference, the following table summarizes the Lock Status icons that you might see in MySession:

And that’s it! You’ve successfully saved your changes to existing data on 3DEXPERIENCE!
Summary
In this blog, we explored the available options for saving your files in SOLIDWORKS directly to the 3DEXPERIENCE platform. We discovered the many ways we can save a file to the platform for the very first time, and we also walked through the extra steps required in re-saving files to the platform once they’ve already been saved to 3DEXPERIENCE.
If you’d like to learn about saving changes to existing files without overwriting their design history, check out our blog on Handling Revisions in SOLIDWORKS with 3DEXPERIENCE!
Stay tuned for more to come!
Sarah is a Technical Support Engineer at SWYFT Solutions with a background in computer-aided design and technical instruction. She graduated from California State University, Fullerton with a Bachelor’s degree in Mechanical Engineering. During her free time, Sarah enjoys road trips, playing piano & writing music, and bringing her personal ideas and creations to life by designing in SOLIDWORKS and 3D printing.
Connect with Sarah on LinkedIn